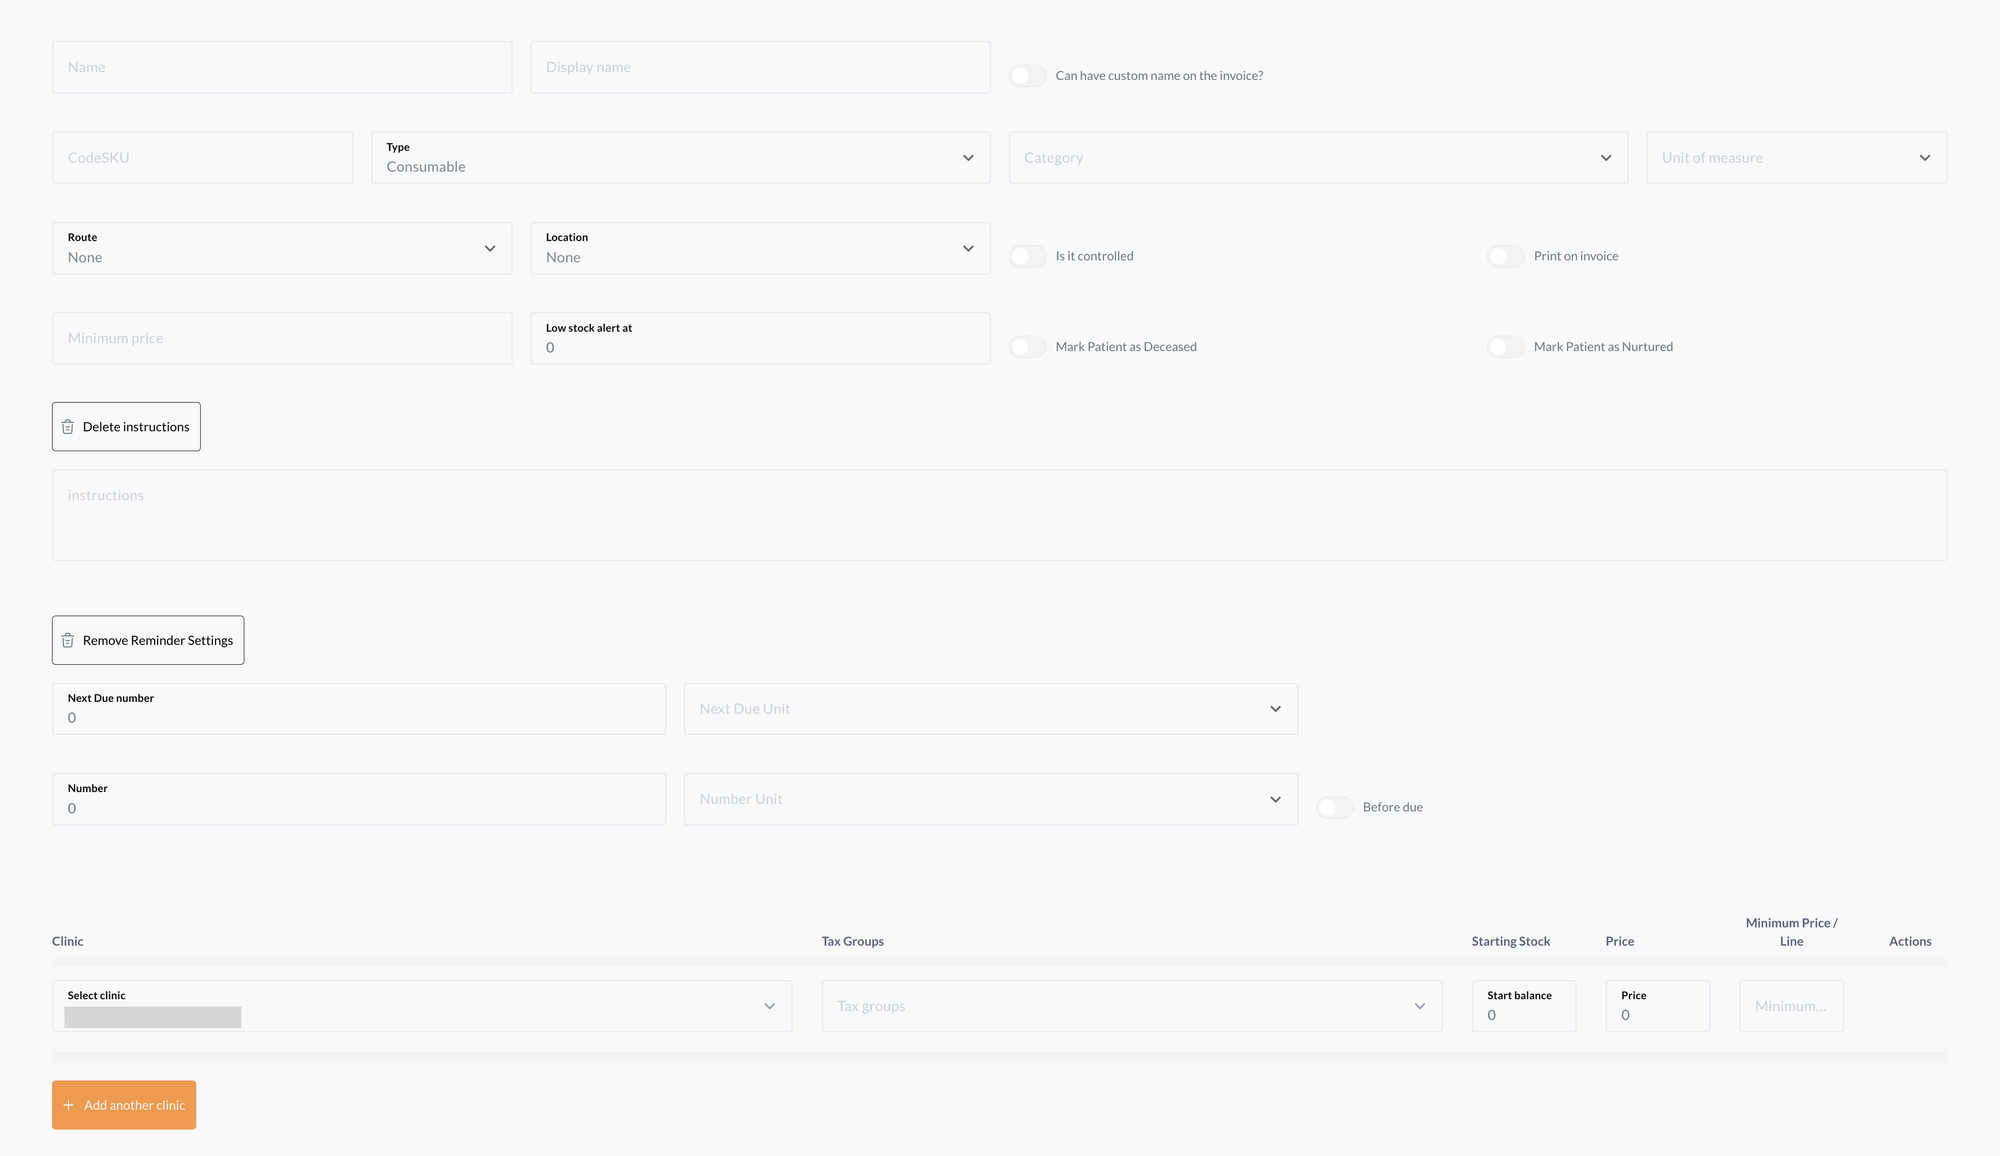
Add item
Overview
Whether you’re adding medications, consumables, or services, the Add Item page gives you full control over item details.
To add a new item, navigate to the Inventory page and click Add Item (top-right corner).
Filling Out the Add Item Form
When adding an item, you’ll see several required and optional fields. Here’s what they mean and how to use them correctly:
Basic Information
- Name (Required) – The internal name of the item (e.g., active ingredient for medications).
- Display Name (Optional) – The name shown on invoices (e.g., brand name for clients).
- Can have custom name on invoice? – Toggle this if you want the Display Name to be used instead of the Name in invoices.
- Code/SKU – A unique code to track the item (Barcode scanner can be used to fill this field).
- Type – Choose between:
- Consumable – Physical products (medications, syringes, bandages, etc.).
- Service – Non-physical procedures (consultations, grooming, lab tests, etc.).
Item Categorization
- Category (Required) – Choose the relevant category (e.g., Medications, Retail, Diagnostics, Grooming).
- Unit of Measure (Required) – Define the measurement unit (e.g., Tablets, Capsules, Boxes, Vials).
Medical & Administration Details (Applicable to medications)
- Route – Select how the medication is administered (e.g., IV, IM, PO, SC).
- Location – Recommended administration location (e.g., Right Leg, Neck, Muscle, Skin).
Pricing & Stock Management
- Minimum Price – If your clinic enforces a minimum charge, enter it here. Example:
- If a box of medication costs $10 for 28 tablets, but you charge a minimum of $20, the system ensures that any quantity up to $20 will be invoiced at that minimum amount.
- Starting Stock – The initial stock quantity (only for consumable items).
- Price – The unit price for this item.
- Tax Groups (Required) – Select applicable tax groups per clinic location.
Instructions & Patient Guidance
- Instructions – Enter label instructions that will be printed when dispensing the item (e.g., dosage, frequency, special instructions).
- Print on Invoice? – Toggle this on if you want the instructions to be visible on the invoice.
Reminder Settings (For vaccines & scheduled treatments)
If the item requires follow-up (e.g., vaccine boosters, repeat treatments), configure reminders:
- Next Due Number & Unit – Define when the next dose is due (e.g., 6 months, 1 year).
- Before Due Reminder – Toggle this if you want the system to notify the client before the next due date.
Clinic-Specific Settings (For multi-clinic setups)
If your business has multiple locations, you can assign the item to specific clinics:
- Select Clinic – Choose which clinics this item applies to.
- Different Pricing per Clinic? – If an item has varying prices at different locations, enter them here.
- Different Stock per Clinic? – Manage stock levels individually for each location.
- Different Maximum price per Clinic?
Final Steps: Saving the Item
Once you’ve filled in the necessary fields:
- Double-check all required fields (marked in red if missing).
- Click Save to finalize the item.
- The item will now appear in your Inventory List, ready for stock adjustments and invoicing.
Adding item Tips
- Use Display Names to show client-friendly names while keeping internal naming conventions intact.
- Set Minimum Pricing strategically to ensure profitability on small-quantity sales.
- Configure Reminders for vaccines and repeat treatments to enhance client engagement.
- If you run multiple clinics, always double-check stock & pricing per location to avoid inconsistencies.
By efficiently adding and managing inventory in viggoVet, your clinic will maintain better stock accuracy, improve billing transparency, and ensure smooth patient care.